

Building a Windows NT Virtual Machine with a 10 GB Virtual Hard Disk or VHD.
Installing Windows NT into a Virtual Machine
Windows NT 4.0 can be installed in a virtual machine using the standard Windows NT CD.
Note: Some Microsoft Windows NT OEM disks included with new computers are customized for those computers and include device drivers and other utilities specific to the hardware system. Even if you can install this Windows NT operating system on your actual computer, you may not be able to install it in a virtual machine. You may need to purchase a new copy of Windows to install in a virtual machine.
Note: If you are going to run a Windows NT virtual machine with IDE virtual disks on a multiprocessor host computer, you may notice slower than expected disk input/output performance. For more information, see Disk Performance in Windows NT Guests on Multiprocessor Hosts on page 361.
Before installing the operating system, be sure that you have already created a new virtual machine and configured it using the VMware ESX Server Virtual Machine Wizard.
Windows NT Installation Steps
Note: Windows NT 4.0 virtual machines must have Service Pack 4 or higher installed. If your initial installation is from an installation disc that has a lower service pack level, you must first create the virtual machine with less than 3.5GB of RAM. After applying Service Pack 4 or higher, you may use the VMware Management Interface to increase the memory setting to as much as 3.6GB.
To install Windows NT into a virtual machine:
- Use the VMware Management Interface to verify the virtual machine’s devices
are set up as you expect before starting the installation.
For example, if you would like networking software to be installed
during the Windows NT installation, be sure the virtual machine’s
Ethernet adapter is configured and enabled.
If you plan to install the guest operating system from a physical CD-ROM disc, be sure the CD-ROM drive is connected to the virtual machine.
- Insert the Windows NT CD in the CD-ROM drive on your VMware ESX Server host.
- Power on the virtual machine to start installing Windows NT.
- If you have enabled the virtual machine’s Ethernet Adapter, a VMware PCI Ethernet Adapter is detected and set up automatically. The default settings should work fine and do not need to be changed.
- Finish the Windows NT installation.
VMware Tools
Be sure to install VMware Tools in your in your guest operating system.
Setting up a Windows NT 4.0 Guest with Multiple Disks
To set up a virtual machine running Windows NT 4.0 and using multiple disks, you must first create a virtual machine with only one disk. Install Windows NT on that disk. Then use the Configuration Editor (Settings > Configuration Editor) to add the additional disks.
In addition, note that if you have a Windows NT 4.0 guest with a SCSI virtual disk, you cannot add both an additional SCSI disk and an IDE disk to the configuration.
Enabling Sound After Installing Windows NT
The VMware ESX Server sound device is disabled by default and must be enabled with the Configuration Editor (Settings > Configuration Editor) after the operating system has been installed.
Enabling Networking After Installing Windows NT
If networking was disabled at the time you installed Windows NT, you can enable it after the operating system has been installed.
- Shut down Windows NT and power off the virtual machine.
- Enable networking for the virtual machine.
- Power on the virtual machine.
- While Windows NT is booting, insert the Windows NT 4.0 CD in the CD-ROM drive on your VMware ESX Server host.
- Log in to Windows NT and open the Network properties page by double-clicking the Network icon in the Control Panel.
- Change to the Network Adapters screen by clicking the Adapters tab.
- Click the Add button and select AMD PCNET Family Ethernet Adapter from the list.
- A message pops up prompting you to enter a path for the Windows NT files. Specify the \I386 directory on the CD in the path you enter (for example, type D:\i386 if the CD is in drive D) and click Continue.
- Windows NT setup prompts you for the Windows NT files again. Click Continue.
- Use the default adapter settings; they do not need to be changed. Windows NT setup prompts you again for a path to the Windows NT files. Click Continue to finish installing the driver.
Known Issues
On a Linux host with an XFree86 3.x X server, it is best not to run a screen saver in the guest operating system. Guest screen savers that demand a lot of processing power can cause the X server on the host to freeze. ` Back to top
© 2001-2002 VMware, Inc. All rights reserved.
Install or Copy the following
1. Install Windows 4.0 with Inside Windows NT with Helen Custer
2. Install Windows NT 4.0 Embedded
3. Install Windows NT 4.0 Source (From UVa professor with Deans permission because I had straight A's from prep school).
4. Install the Windows NT 4.0 DDK and SDK
5. Install Visual Studio 4.0
7. Install Office 1997 Professional
12. Install OpenNT
13. Install the MSDN Magazine Archive CDROM.
Only use CDROM capacity 700mb on Windows NT 4.0 because DVD wasn't supported.
Building a Jazz Computer
The Jazz computer architecture is a motherboard and chipset design originally developed by Microsoft for use in developing Windows NT. The design was eventually used as the basis for most MIPS-based Windows NT systems.
In part because Microsoft intended NT to be portable between various microprocessor architectures, the MIPS RISC architecture was chosen for one of the first development platforms for the NT project in the late 1980s/early 1990s. However, around 1990, the existing MIPS-based systems (such as the TURBOchannel-equipped DECstation or the SGI Indigo) varied drastically from standard Intel personal computers such as the IBM AT—for example, neither used the ISA bus so common in Intel 386-class machines.
For those and other reasons, Microsoft decided to design their own MIPS-based hardware platform on which to develop NT, which resulted in the Jazz architecture. Later, Microsoft sold this architecture design to the MIPS Computer Systems, Inc. where it became the MIPS Magnum.
The Jazz architecture includes:
- a MIPS R4000/R4400 or compatible microprocessor
- an EISA bus
- a framebuffer for video output (the G364 framebuffer)
- PS/2 connectors for mouse and keyboard
- a floppy-disk controller
- onboard 16-bit sound system
- onboard National Semiconductor SONIC Ethernet
- onboard NCR 53C9x SCSI chipset for hard disk and CD-ROM interface
- standard IBM AT serial and parallel ports
- IBM AT-style time-of-year clock
This design was simple enough and powerful enough that a majority of Windows NT-capable MIPS systems were based on modified versions of the Jazz architecture. A list of systems which more or less were based on Jazz includes:
- MIPS Magnum (R4000 PC-50 and SC-50 versions)
- Acer PICA – uses S3 videocard
- Olivetti M700 – has different video and sound system
- NEC RISCstation – Jazz with PCI
The Jazz systems were designed to partially comply with the Advanced RISC Computing (ARC) standard, and each used the ARC firmware to boot Windows NT. Other operating systems were also ported to various Jazz implementations, such as RISC/os to the MIPS Magnum.
There were also some MIPS systems designed to run Windows NT and comply with the ARC standard, but nevertheless were not based on the Jazz platform:
- DeskStation Tyne
- NeTpower FASTseries Falcon
- ShaBLAMM! NiTro-VLB
- Siemens-Nixdorf RM-200, RM-300 and RM-400
https://en.wikipedia.org/wiki/Jazz_(computer)
Making a Windows XP Virtual Machine Using 400GB as the Virtual Hard Disk or VHD.
Windows XP Home Edition or Professional can be installed in a virtual machine using the corresponding Windows XP distribution CD. If you wish to use sound in the virtual machine, be sure to read Using Sound in a Windows XP Guest Operating System below.
Note: Some Microsoft Windows XP OEM disks included with new computers are customized for those computers and include device drivers and other utilities specific to the hardware system. Even if you can install this Windows XP operating system on your actual computer, you may not be able to install it in a VMware ESX Server virtual machine. You may need to purchase a new copy of Windows to install in a virtual machine.
Note: To use SCSI disks in a Windows XP virtual machine, you need a special SCSI driver available from the download section of the VMware Web site at http://www.vmware.com/download. Follow the instructions on the Web site to use the driver with a fresh installation of Windows XP. If you have a virtual machine with a SCSI virtual disk and a Windows 9x, Windows Me, Windows NT or Windows 2000 guest operating system and want to upgrade it to Windows XP, install the new SCSI driver before upgrading the operating system.
To install Windows XP into a virtual machine:
Note: If you want to run Windows XP Home Edition or Professional in a VMware ESX Server virtual machine, be sure you have a full installation CD for the operating system.
Before installing the operating system, be sure that you have already created a new virtual machine and configured it using the Virtual Machine Wizard.
Follow these steps to install Windows XP into a virtual machine:
- Use the Configuration Editor to verify the virtual machine's devices are set up as you expect before starting the installation. For example, if you would like networking software to be installed during the Windows XP installation, be sure the virtual machine's Ethernet adapter is configured and enabled. VMware also recommends that you disable the screen saver on the host system before starting the installation process.
- Insert the installation CD in the CD-ROM drive on your VMware ESX Server host.
- Power on the virtual machine to start installing the guest operating system.
- Follow the installation steps as you would for a physical machine, except as noted in the following steps.
- After the system reboots, a message box asks if you want Windows to automatically correct your screen resolution and color depth setting. Do not make the change at this time. You cannot change resolution and color depth until you have installed the VMware SVGA driver - part of the VMware Tools package.
- Run the VMware Tools installer. For details, see Using VMware Tools.
- When the guest operating system reboots, allow it to change the screen resolution and color depth setting.
Using Sound in a Windows XP Guest Operating System
The VMware ESX Server sound device is disabled by default and must be enabled with the Configuration Editor (Settings > Configuration Editor) after the operating system has been installed.
Note: Your sound card must be working in your host operating system in order to use sound in the virtual machine.
In addition, Windows XP does not automatically detect and install drivers for ISA sound cards, such as the Creative Sound Blaster emulated in a virtual machine. Follow these steps to configure sound in a Windows XP guest operating system.
Known Issues
The Microsoft Windows XP product activation feature creates a numerical key based on the virtual hardware in the virtual machine where it is installed. Changes in the configuration of the virtual machine may require you to reactivate the operating system. There are some steps you can take to minimize the number of significant changes.
- Set the final memory size for your virtual machine before you activate
Windows XP. When you cross certain thresholds — approximately 32MB, 64MB,
128MB, 256MB, 512MB and 1GB — the product activation feature sees the changes
as significant.
Note: The size reported to the Windows product activation feature is slightly less than the actual amount configured for the virtual machine. For example, 128MB is interpreted as falling in the 64MB–127MB range. - Install VMware Tools before you activate Windows XP. When the SVGA driver in the VMware Tools package is installed, it activates features in the virtual graphics adapter that make it appear to Windows XP as a new graphics adapter.
- If you want to experiment with any other aspects of the virtual machine configuration, do so before activating Windows XP. Keep in mind that you have 30 days for experimentation before you have to activate the operating system.
For more details on Windows XP product activation, see the Microsoft Web site.
On a Linux host with an XFree86 3.x X server, it is best not to run a screen saver in the guest operating system. Guest screen savers that demand a lot of processing power can cause the X server on the host to freeze.
The hibernation feature is not supported in this release. Instead of using the guest operating system’s hibernate feature, suspend the virtual machine by clicking Suspend on the VMware ESX Server toolbar.
© 2001-2002 VMware, Inc. All rights reserved.
Install or Copy the following
1. Install Windows XP with Windows Internals 4th ebook
2. Install Windows XP Embedded
3. Install Windows XP/2003 Source (due to incomplete contract it's on the internet archive, but complete source).
4. Install the Windows 2003 DDK and SDK
5. Install Visual Studio 2003 Academic
6. Install Visual Studio 2005 Professional
7. Install Office XP Professional
8. Install the Windows Research Kernel Source. With Curriculum Toolkit (from 2009 UVa Wise Sysdmin)
9. Install the Shared Source Common Language Infustructure v 2.0 with ebook (from Shared Source contract 2006)
10. Install SCO OpenServer 5 Source
11. Install MinWin (from Beta Archive)
12. Install Windows Services for UNIX v 3.0
13. Install the MSDN Magazine Archive CDROM.
14. Make a Longhorn Virtual Machine from the PDC 2003 Discs and remove the time bomb and crack the activation then mount it in the Windows XP VM.

Building SCO on Windows XP
For my latest project I am building Open Server 5 Source on Windows Xp with Windows Services for UNIX 3.0.then finding the Microsoft Partners like Terilk RAD Controls to fill in the gaps.to production in my MSDN Magazine Archive. the Partners are in 'New Stuff' in every month.


.png)

Using Source Depot

The above screenshot from my computer shows the NT Codebase ready to ready to be enlisted into source depot you need you International MAP file changed to SD.MAP
Building DOS 1.25
.png)
After your done building DOS make a 6.22 Virtual Machine and install Microsoft Fortran and the MKS Toolkit for MS-DOS.
Microsoft UNIX Licensing.
1978 AT&T System 7 for XENIX
1991 Apple System 7 for Windows 3.1
1994 DEC UNIX for Windows NT
2002 SCO UNIX for Windows XP
After XP Microsoft moved away from UNIX Licensing and started International ECMA 335 & 336 Standard or .NET.
Microsoft Buys Into SCO Group’s Unix
Microsoft to license Unix code
I licensed Windows NT, XP and 2003 code from Microsoft and have my original System Integrator contract.my startup is a Gold Microsoft Partner and Microsoft Bizspark Graduate. I'm a UVa Computer Science Alumni in 2013 with a 3.2 GPA and Scholar award. I need my Windows Vista, 7, 8/8.1 Source to complete my Microsoft contract and I have my software assurance
Startups … inside giant companies
Apple's Darwin Build

In older macOS releases ending with Snow Leopard. You can use Apple's former build utility called Darwin Build to fetch releases of Apple sources here is a link to macOS Forge. You can still use Bash for Windows or the Git For Windows SDK. and step 6 & 7 on Windows.
- install darwinbuild
mkdir 9G55 && cd 9G55sudo -sdarwinbuild -init 9G55for X in $(darwinxref version '*' | cut -d '-' -f 1); do darwinbuild -fetch $X; donemkdir AllSourcefor X in Sources/*; do tar zxvf $X -C AllSource/; done
You can also boot Darwin 8.0 Panther on 2005 x86 hardware.
Code Plex

MS CodePlex Archive ZIPs
I've been on Code Plex ever since the beginning and I was able to fit my codeplex,archive my entertainment and everything else on a 36 terabyte RAID 1 with a RAID Card. Also you might like
FSCK Technology for older systems like OpenStep
Windows Build Collection
Here is a list of windows Build Numbers. You might want to cache the beta wiki like I have
| Name / Description | Version | Build Number | Public Release | RTM Release |
|---|---|---|---|---|
| Windows NT 3.1 | 3.10 | 511 | 1993-07-27 |
|
| Windows NT 3.5 | 3.50 | 807 | 1994-09-21 |
|
| Windows NT 3.1, Service Pack 3 | 3.10 | 528 | 1994-11 |
|
| Windows NT 3.51 | 3.51 | 1057 | 1995-05-30 |
|
| Windows 95 | 4.00 | 950 | 1995-08-24 |
|
| Windows 95 OEM Service Release 1 | 4.00 | 950 A | 1996-02-14 |
|
| Windows 95 OEM Service Release 2 | 4.00 | 950 B | 1996-08-24 |
|
| Windows NT 4.0 | 4.0 | 1381 | 1996-08-24 | 1996-07-31 |
| Windows 95 OEM Service Release 2.1 | 4.00 | 950 B | 1997-08-27 |
|
| Windows 95 OEM Service Release 2.5 | 4.00 | 950 C | 1997-11-26 |
|
| Windows 98 | 4.10 | 1998 | 1998-05-15 |
|
| Windows 98 Second Edition (SE) | 4.10 | 2222 | 1999-05-05 |
|
| Windows 2000 | 5.0 | 2195 | 2000-02-17 | 1999-12-15 |
| Windows Me | 4.90 | 3000 | 2000-09-14 | 2000-06-19 |
| Windows XP | 5.1 | 2600 | 2001-10-25 | 2001-08-24 |
| Windows XP, Service Pack 1 | 5.1 | 2600.1105-1106 | 2002-09-09 |
|
| Windows Server 2003 | 5.2 | 3790 | 2003-04-24 |
|
| Windows XP, Service Pack 2 | 5.1 | 2600.2180 | 2004-08-25 |
|
| Windows Server 2003, Service Pack 1 | 5.2 | 3790.1180 | 2005-03-30 |
|
| Windows Server 2003 R2 | 5.2 | 3790 | 2005-12-06 | 2005-12-06 |
| Windows Vista | 6.0 | 6000 | 2007-01-30 | 2006-11-08 |
| Windows Server 2003, Service Pack 2 | 5.2 | 3790 | 2007-03-13 |
|
| Windows Home Server | 5.2 | 4500 | 2007-11-04 | 2007-07-16 |
| Windows Vista, Service Pack 1 | 6.0 | 6001 | 2008-02-04 |
|
| Windows Server 2008 | 6.0 | 6001 | 2008-02-27 | 2008-02-04 |
| Windows XP, Service Pack 3 | 5.1 | 2600 | 2008-04-21 |
|
| Windows Vista, Service Pack 2 | 6.0 | 6002 | 2009-05-26 | 2009-04-28 |
| Windows Server 2008, Service Pack 2 | 6.0 | 6002 | 2009-05-26 |
|
| Windows 7 | 6.1 | 7600 | 2009-10-22 | 2009-07-22 |
| Windows Server 2008 R2 | 6.1 | 7600 | 2009-10-22 | 2009-07-22 |
| Windows 7, Service Pack 1 | 6.1 | 7601 | 2011-02-22 |
|
| Windows Server 2008 R2, Service Pack 1 | 6.1 | 7601 | 2011-02-22 | 2011-02-09 |
| Windows Home Server 2011 | 6.1 | 8400 | 2011-04-06 | 2011-04-06 |
| Windows Server 2012 | 6.2 | 9200 | 2012-09-04 | 2012-08-01 |
| Windows 8 | 6.2 | 9200 | 2012-10-26 | 2012-08-01 |
| Windows 8.1 | 6.3 | 9600 | 2013-08-27 | 2013-10-17 |
| Windows Server 2012 R2 | 6.3 | 9600 | 2013-10-18 | 2013-08-27 |
| Windows 10, Version 1507 | 10.0 | 10240 | 2015-07-29 | 2015-07-15 |
| Windows 10, Version 1511 | 10.0 | 10586 | 2015-11-10 |
|
| Windows 10, Version 1607 | 10.0 | 14393 | 2016-08-02 |
|
| Windows Server 2016, Version 1607 | 10.0 | 14393 | 2016-08-02 |
|
| Windows 10, Version 1703 | 10.0 | 15063 | 2017-04-05 |
|
| Windows 10, Version 1709 | 10.0 | 16299 | 2017-10-17 |
|
| Windows Server 2016, Version 1709 | 10.0 | 16299 | 2017-10-17 |
|
| Windows 10, Version 1803 | 10.0 | 17134 | 2018-04-30 |
|
| Windows Server 2019, Version 1809 | 10.0 | 17763 | 2018-10-02 |
|
| Windows 10, Version 1809 | 10.0 | 17763 | 2018-11-13 |
|
| Windows Server 2008, Service Pack 2, Rollup KB4489887 | 6.0 | 6003 | 2019-03-19 |
|
| Windows 10, Version 1903 | 10.0 | 18362 | 2019-05-21 |
|
| Windows 10, Version 1909 | 10.0 | 18363 | 2019-11-12 |
|
| Windows 10, Version 2004 | 10.0 | 19041 | 2020-05-27 |
|
| Windows 10, Version 20H2 | 10.0 | 19042 | 2020-10-20 |
|
Windows Interoperability
In 2009 Microsoft tried there Interoperability with UNIX/LINUX with not much success with the publicin Windows 10 it is getting better please read Microsoft learn for complete details. Some of the open group projects are openpegusus for WBEM and motif for a standard window.
Microsoft Windows 7

For Windows 7. So far you need you Windows API Code Pack, Windows 7 SDK and WDK and you .NET Framework 3.5 Service Pack 1 Reference source which shipped with Windows 7 and in support until 2029. Which I have I'll try to put it on my github when my company is funded. Until then you can use this tech incident that I and Microsoft worked on below. The .NET Framework 4.6.1 is in support until 2027 so look for a switch from Linus after that its still Dependency hell in Linux and .NET not the .NET Framework there is a difference.

Windows SDK for Windows 7 and .NET Framework 4
Samples are still being gathered from NT 4.0 to 11 stay tuned.
Microsoft .NET Framework Lifecycle

Visual C++ 4.0

You need Visual C++ 4.0 to build the NT 4.0 source kit again with the 4.0 SDK and DDK again using windiff to combine directories. In my opinion Visual C++ 4.0 would be the version to buy with 2005 for XP/2003. As 4.0 comes with the Mac Cross Platform Version, RISC edition and the Embedded Version. XP is in Visual Studio 2019 Compatibility support until 2029 so don't look for Windows 7 source anytime soon. Maybe the Enterprise Source Licensing Program if your company has 10K windows seats. It used to be 700 resource hours. I'm a member of the .NET Foundation and am trying with the Shared Source initiative again. You need your desktop optimization packs with software assurance.

Visual Studio 2019 Platform Targeting and Compatibility
XP in support in VS 2019 until 2029.
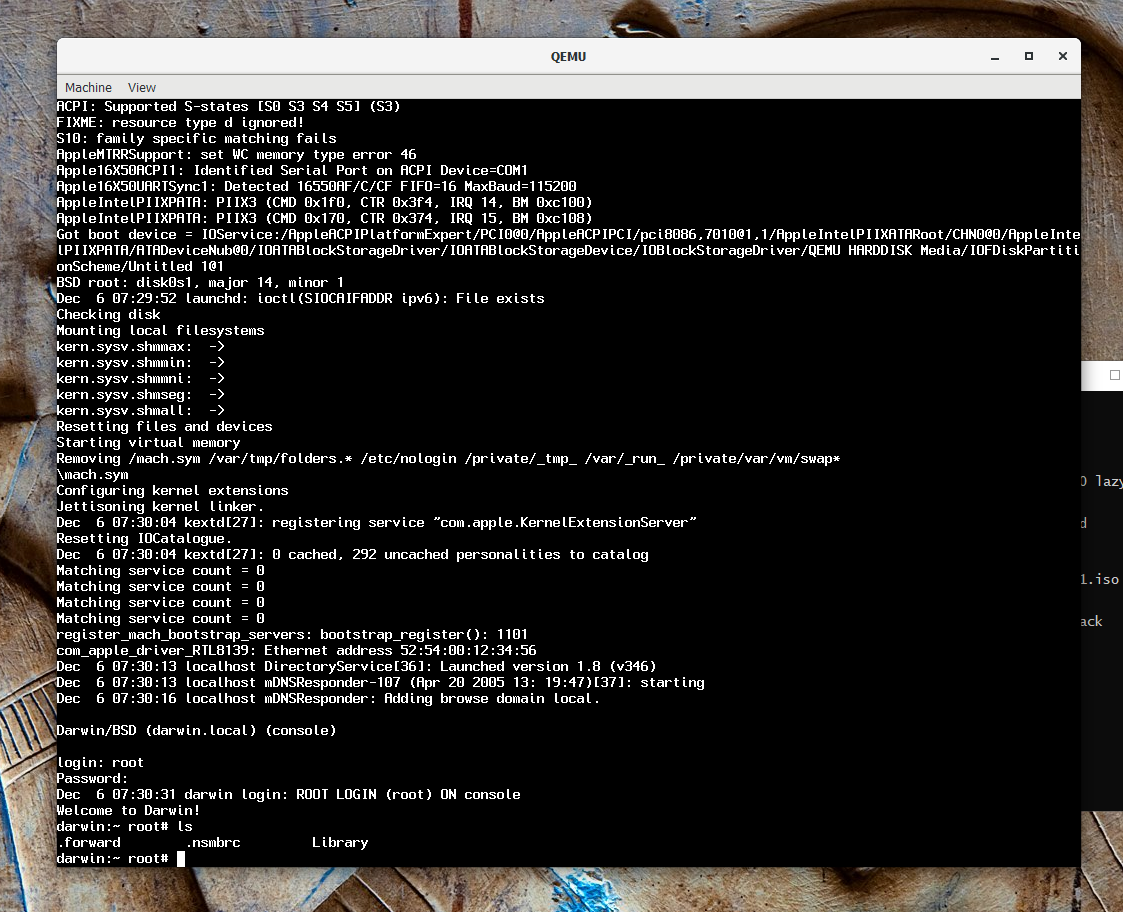
Installing Darwin on QEMU

Darwin 8.0.1 (corresponding to Mac OS X 10.4) seems to be the latest available full installer image, at least, until the PureDarwin project produces a new one.
List of available ISO images
More recent versions of packages are available in source form:
Open Source website (links by OS release)
Full list of packages (some aren't linked under any OS release)
Installing
Download and extract installation CD image:
Darwin 8.0.1 (was under “Darwin 8.0.1 Installer CD” on old website)
MD5: dbd260dda994093a11c31afbe624aa34
SHA-256: a26f9f14795fe0687bd647d41b712464c9a61430736fae4aa0fdb89207e1a62a
$ gunzip darwinx86-801.iso.gz
Set up QEMU VM:
$ qemu-img create -f qcow2 darwin.qcow2 10G
Start VM:
$ qemu -net none -drive file=darwin.qcow2,cache=writeback -cdrom
                darwinx86-801.iso -boot d
Other useful qemu options:
-m 512and-enable-kqemu
Installation steps:
First boot:
Select disk
"
2" (manual partitioning)"
y" (initialize MBR)In fdisk:
> auto hfsIgnore the warning
> update> write> quit
Enter partition name
"
yes" (clean install)"
darwin" (volume name)Continue (reboot)
Second boot (make sure to boot from CD again):
Select disk
"
3" (existing partition)Enter partition name
"
hfs" (HFS+ filesystem)"
yes" (clean install)"
darwin" (volume name)Wait for installation to complete...
Enter root password
"
darwin" (hostname)"
3" (spawn shell)# halt
Configure VM for normal startup:
Remove QEMU flags
-cdrom darwinx86-801.iso -boot d
Basic configuration
Enable VM networking
Change QEMU flags:
-net none→-net nic,model=rtl8139 -net user
SSH access
Change QEMU flags:
-net user→-net user,hostfwd=tcp:127.0.0.1:10022-:22(pick any port instead of 10022)Log in to VM, enable SSH:
# service ssh start
Connect to VM with
$ ssh -p 10022
                root@localhost
Optionally add an alias to host
~/.ssh/configto simplify connecting:Host darwin-vm HostName localhost Port 10022 User root
Connect to VM with
ssh darwin-vm
Install public key to simplify logging in:
$ cat .ssh/id_rsa.pub | ssh darwin-vm
                'mkdir .ssh; cat >>.ssh/authorized_keys'
Add
-nographicto QEMU flags to disable console window, which is no longer required
Some familiar aliases
# echo "alias ll='ls -l'" >>/etc/bashrc# echo "alias la='ls -lA'" >>/etc/bashrc
Timezone
# ln -sf /usr/share/zoneinfo/UTC /etc/localtime
Temporary filesystem
Using a temporary disk image to build software helps keep the main disk image file smaller.
$ qemu-img create -f qcow2 scratch.qcow2
        10G
Add QEMU flag:
-drive file=scratch.qcow2,cache=writebackand bootFigure out which disk number corresponds to the scratch drive:
# mount# ls /dev/rdisk*It's the one that isn't mounted and doesn't have any partitions (sn-suffixed files)
It's usually, but not always, /dev/rdisk1
# newfs_hfs -v scratch /dev/rdisk1# rebootAvailable as
/Volumes/scratchon next boot
Notes
The VM sometimes fails to boot with "
panic(...):
        nfs_boot_init failed
"; if this happens, restart it.
Updating the system
Kernel (xnu)
It breaks support for FAT (and thus the QEMU virtual FAT drive)
Support for FAT is in the msdosfs package which requires Xcode to build
An alternative to the virtual FAT drive for transferring files is writing tar archives directly to an unpartitioned drive
SSH scp is another alternative
Requires:
corresponding cctools (e.g. initially installed version or cctools-590.42.1, but not cctools-667.3)
gcc 3.3 (revert if changed with
gcc_select
                3.3
)
Source package: xnu-792.6.76.tar.gz (update to version listed under “Mac OS X 10.4.3”)
MD5: 854f44519778e8bde4283e275ed154e6
SHA-256: 35c5ed2f1399c770583a229a733d064dc302ae6327a7fcb40996e1f3c474f568
Building:
# cd /Volumes/scratch# tar xzf xnu-792.6.76.tar.gz# cd xnu-792.6.76Patch to help build gcc_42-5577:
# sed -i.tmp 's/defined *(__i386__)/& ||
                        defined(__x86_64__)/' bsd/{machine,sys}/*.h
# make DSTROOT= install
Reboot.
uname -ris now 8.7.0.
Standard library (Libc)
Requires updated xnu (xnu-792.6.761).
Source package: Libc-391.2.10.tar.gz (update to version listed under “Mac OS X 10.4.3”)
MD5: 7a1a08d1b68668fc41916d6cf39182a4
SHA-256: e90b78d310235544623f26c6f18e27b329b5bc778deab8e57332e8e90ab92f11
Building:
# cd /Volumes/scratch# tar xzf Libc-391.2.10.tar.gz# cd Libc-391.2.10# sed -i.tmp s/NOTIFY_STATUS_OK/0/g gen/{asl.c,syslog.c}Patch to help build gcc_42-5577:
# sed -i.tmp 's/defined *(__i386__)/& ||
                        defined(__x86_64__)/' include/machine/*.h
# make OBJROOT="$PWD"/obj install
Upgrading GCC
dyld
This is optional.
Source package: dyld-46.16.tar.gz (under “Mac OS X 10.4.11.x86”)
MD5: a97d4d2a77b3e5f2ff9757007cae0596
SHA-256: cf753c3a2cef239b1334c56603b36d206f54d613daa078ce0f2d73c3e2a0dd82
Makefile: dyld.mk
Darwin doesn't include Xcode, which is required to build this package. This makefile provides alternative build instructions.
Building:
# cd /Volumes/scratch# tar xzf dyld-46.16.tar.gz# cd dyld-46.16# sed -i.tmp '/case CPU_TYPE_X86_64:/,/break;/d;/__pthread_tsd_first/d' src/dyld.cpp# ln -s libstdc++.a /usr/lib/gcc/i686-apple-darwin8/4.0.0/libstdc++-static.a# bsdmake -f dyld.mk VERSION_DYLD=46 install
cctools
Choice of version:
cctools-667.3
Too new to build xnu.
Source package: cctools-667.3.tar.gz (under “Mac OS X 10.5.8”)
MD5: 518166e6ddbd0287bebee3d00fddee7d
SHA-256: 1ba43a3d3bcf138a196e714666927c706857226adccf2e69db4f08e940631c0d
cctools-590.42.1
Too old to build gcc.
Source package: cctools-590.42.1.tar.gz (update to version listed under “Mac OS X 10.4.3”)
MD5: 6d875c5483699fd0f1e150facae35256
SHA-256: 61c86c4dc556daafbabebd8162bfbce8214843b218fefbd15c6c1ba03d225a10
Building:
# cd /Volumes/scratch# tar xzf cctools-667.3.tar.gz# cd cctools-667.3# sed -i.tmp '/install.*strip/{h;s/strip/seg_hack/gp;g;s/ -s / /;}' misc/Makefile# sed -i.tmp s/ld_classic/ld/ ld/Makefile# make install
The new assembler will often show the warning "
indirect
        jmp without '*'
" on code generated by the old GCC.
gcc
Choice of version:
gcc_42-5577
Latests gcc_42 package (newer packages are named gcc). GCC 4.2.1. Requires patched system include files, which can be done when upgrading xnu and Libc (see above).
Source package: gcc_42-5577.tar.gz (update to version listed under “Mac OS X 10.5.8”)
MD5: dab7ad45f76919f058a6f1cf3a0e91d8
SHA-256: fd6459ab701b41dc1297cdbc27f302c558d766505cfe8dd1d6ec0d257fef0e81
gcc_42-5531
Slightly older version. Doesn't require any changes to include files.
Source package: gcc_42-5531.tar.gz (under “Mac OS X 10.5.8”)
MD5: 959ecd224cea2477d57b1c3026fe05ee
SHA-256: 924862e2092fa11754ec9226a0de4772d831c40500231728055d00d1bb3a632e
Requires cctools-667.3 and optionally dyld
Building:
# cd /Volumes/scratch# tar xzf gcc_42-5577.tar.gz# cd gcc_42-5577If dyld isn't upgraded, patch to revert debugging format from DWARF to stabs:
# sed -i.tmp 's/\(#define
                                PREFERRED_DEBUGGING_TYPE \).*/\1DBX_DEBUG/'
                                gcc/config/darwin.h
# sed -i.tmp '/darwin_macho_att_stub/s/Init.*//' gcc/config/darwin.opt
# sed -i.tmp '/x86_64/s/|| exit 1//' build_gcc# ln -s true /usr/bin/dsymutil# gnumake RC_ARCHS=i386 installDon't try to set
DSTROOT=/, it deletes everything.
# cp -pR dst/* /# cp -pR obj/dst-i686-i686/usr/lib/libgcc_s* /usr/lib/gcc/i686-apple-darwin8/4.2.1/
GCC is now installed as gcc-4.2.
It can be made default with
gcc_select 4.2.

Making a Cygwin Mac Virtual Machine

VirtualBox/Setting up a Virtual Machine/Mac OS X
The following installation script:
- ...is free and open-source
- ...requires only VirtualBox with its Extension Pack and dependencies that can be easily installed in a single command with most open-source package managers
- ...downloads macOS Catalina, Mojave and High Sierra directly from Apple's servers
- ...installs macOS without modifying the original Apple binaries and without third-party bootloaders
- ...creates a VM that is compatible with OpenCore and can be exported (with manual modifications) to KVM/QEMU for near-native performance
- ...runs on Linux, Windows (WSL 1, Cygwin), and macOS
- You will be asked to enter your Apple ID. Even if you have an Apple ID, do not enter now.
You dont have to hack it anymore at least by Cygwin or POSIX standards.
My Knowledge Work

From 2000-2021 I did a lot of knowledge work for my self and Microsoft I was even followed by MSFT Research before the invasion of the urkaine.A war over viking land if you will. I did knowledge work and built various Microsoft software including Windows. I am Windows Internals Certified for Windows 7 in 2011.
How knowledge workers use the web

Building Windows XP/2003

To build Windows XP or 2003 32- bit first you need to make a Windows XP/2003 Oracle Virtual Machine. Mount a shared folder with the files in them. Also install the Services for UNIX. And the SFU SDK. Use the System Integrator XP or 2003 Source Kit with the 2003 DDK and Platform SDK and combine them using Windiff or SDKdiff.
- 1. Set the date to August 1st 2003 by typing 'date' in the cmd window
- 2. Make sure the files are not read only.
- 3. Install the 2003 SP1 driver certificate.
- 4. chdir to the 2003 root as admin.
- 5. type 'tools\razzle free offline'
- 6. type 'path tools\sp;%path%'
- 7. type 'tools\checktestroot.cmd and checktestca.cmd'
- 8. type 'perl tools\timebuild.pl -NOCLEANBUILD -NOSYNC -NOSCORCH'
- 9. type 'BUILD /ZP' after you fix errors
- 10. If you need to use 'expand /r' to X:\ENGLISH\WIN2003\ENT\I386\* C:\binaries.x86fre from a retail DVD.
- 11. certmgr.msc, go to Trusted Root Certification Authorities\Certificates and remove the Microsoft Test Root Authority certificate, Sign out and Sign in again.


You might want to download skunkware from SCO and try to build it in SFU in 32-bit Windows XP or 2003 for extra points.
Windows Embedded Standard 2009
When I was in college at the University of Virginia I obtained Windows Embedded 2009 Standard. Here I will provide the steps necessary to build a Windows XP Embedded Thin Client and ISO.
Step 1 Install Windows Embedded Standard 2009.
Step 2. Create a small 650MB FAT partition and run sysprep on the partition.The partition needs to be FAT because sysprep is 16 or 32 bit.
Step 3. Open the Target Designer.
Step 4. Save your file as 'Thin Client.slx" and drag an thin client template from the designer templates to the workspace.
Step 5. Go to Configuration -> Check Dependencies or press F5.
Step 6. Go To Configuration -> Build Target Image after you perform the necessary tasks.
Step 7. Run 'hd2iso' from the command line and follow the on screen instructions.
Before you build the image you might have to correct build warnings.such as finding missing components and putting them in the workspace.

Step 1 Install Windows Embedded Standard 2009.
Step 2. Create a small 650MB FAT partition and run sysprep on the partition.The partition needs to be FAT because sysprep is 16 or 32 bit.
Step 3. Open the Target Designer.
Step 4. Save your file as 'Thin Client.slx" and drag an thin client template from the designer templates to the workspace.
Step 5. Go to Configuration -> Check Dependencies or press F5.
Step 6. Go To Configuration -> Build Target Image after you perform the necessary tasks.
Step 7. Run 'hd2iso' from the command line and follow the on screen instructions.
Before you build the image you might have to correct build warnings.such as finding missing components and putting them in the workspace.

Windows CE Embedded

There are several great books on Embedded Windows OS design I'll post more when I find better ones. I started Embedded design in college With Microsoft in Platform Builder and CE 3.0 at a vocational college in Elizabethon TN recognized nationally by the Bill and Melinda Gates Foundation. Some books include
I haven't done any Embedded design since 2001. After a 5 year music career and good ambient music I'm becoming a Microsoft Partner again and .NET foundation team member. My domain is paid with unlimited SSD storage for 5 years. I do like computer nostalgia and may turn my Windows Server installation into a type 1 hypervisor. for now I'm using Virtual Box. Here is the Shared Source Initiative for Embedded and MVP which is what I have we will get into 2013 later maybe in 2021.
Azure Student Starter
After being and MSDN Subscriber since 2003. and on Bizspark I'm stopping my Microsoft software as of 2019 and saving for when I'll really need the new mac or Windows OS I'm on Windows 10 Enterprise 2019 LTSC With a Quadro FX series HP Desktop. and have only used Visual Studio 6.0 2008 team system 2012 ultimate and noe 2017. Microsoft has sent me hundreds of DVD I don't even use I finaly found my Adobe Creative Suite on DVD with 8 DVD's in a Box CS2 and I have my CS6 Master Collection with Gold Plan. Adobe apparently is on the S&P 100 and doesn't make many boxes more on my Adobe contract later. Here is Microsoft Azure student Starter for students and Alumni. Next week I'm plying my Softimage 2015 and just stopping it does work on Windopws 10 and 10 is the last version of Windows reportedly. It is Microsoft's Adaptive Systems group and project 'Brass' from DARPA that looks hopeful making software last hundreds of years.
2011 MVP and Shared Source

Microsoft Design Principles and Scenarios Star 2011

Building Singularity

In 2010 I downloaded and read about a Microsoft research Operating System called Singularity. Now I'm going to tell you how to build it. First you can download it from Codeplex here. Now in on the internet archive.
Next unzip the RDK and open a cmd prompt as administrator and run the
configure.cmd
and run as administrator, accept the defaults and press enter.
This should place a Singularity shortcut on your desktop. Next open the the shortcut placed on your desktop and type
msb Distro\World.proj
allow about 25-30 min depending on your machine to build.
If you have other virus protection software on your computer other than Windows defender remove it. As the build requires privileged access to the machine such as assembly language. You should now better by now how not to get viruses off of the internet.
After it is built you should be able to run it in a Microsoft Virtual PC 2007 32-Bit on a Microsoft Windows XP 32-bit Virtual Box VM use VHD for Hyper-V Compatibility.or Server 2003 32-bit to also run Windows UNIX Services.
I might go into more detail later. If you really want to have fun read up on MSBuild and and how to add you own CLI projects to the Applications folder. The Singularity build requires .NET 3.5.You also might need to add "C:\Windows System32;" to your PATH environment variables.
You also can find many of the build tools like boogie and the CLR Profiler on Codeplex. You might want to sandbox your modifications so if Microsoft releases another Singularity variant in the future it will be compatible. Again read up on MSBuild. You can turn on your virus protection after the build. Because many viruses are written in assembly.
Singularity Stack:


.png)
Future of Concurrency and Parallelism

COM

How to luanch the old style Control Panel in Windows 10.

Building Sandcastle Documentation in Visual Studio
Here is a nice article on building MSDN style documentation with sandcastle from The Microsoft Gulf Technical Community.
Building the Windows Research Kernel.
To build the Windows research kernel after to obtain it legally from your academic institution like I did. You may need to download some Visual C/C++ runtime libraries but after that the kernel should kinda be sandboxed and build on Windows XP or later. I'm building it on Windows 8.1. We will be building WRKv1.2.
So open a command prompt and enter:
This will produce kernel files in BASE\NTOS\BUILD\EXE\%arch%
I really don't recommend booting the kernel on anything other than XP, but you can try and there should be instructions that came with the WRK 1.2 on how to do that. Pius you can read David Cutler's original design notes. Also you might get like I did a project called "Project OZ" which you can use the kernel with.

So open a command prompt and enter:
 set wrk= "path to WRK1.2"
 set arch=x86 [or amd64]
 path %wrk%\tools\%arch%;%path%
 cd %wrk%\base\ntos
 nmake -nologo %arch%=
This will produce kernel files in BASE\NTOS\BUILD\EXE\%arch%
I really don't recommend booting the kernel on anything other than XP, but you can try and there should be instructions that came with the WRK 1.2 on how to do that. Pius you can read David Cutler's original design notes. Also you might get like I did a project called "Project OZ" which you can use the kernel with.

Subscribe to:
Posts (Atom)